{var%20f='http://v.t.sina.com.cn/share/share.php?appkey=1515056452',u=z||d.location,p=['&url=',e(u),'&title=',e(t||d.title),'&source=',e(r),'&sourceUrl=',e(l),'&content=',c||'gb2312','&pic=',e(p||'')].join('');function%20a(){if(!window.open([f,p].join(''),'mb',['toolbar=0,status=0,resizable=1,width=440,height=430,left=',(s.width-440)/2,',top=',(s.height-430)/2].join('')))u.href=[f,p].join('');};if(/Firefox/.test(navigator.userAgent))setTimeout(a,0);else%20a();})(screen,document,encodeURIComponent,'','','https://www.xiaopingtou.cn//data/attach/topic/topicKPo7gB.jpg', '推荐 华光传感 的文章《Ubuntu 14.04 Caffe和TensorFlow的ARM NN SDK编译环境搭建及MNI》','https://www.xiaopingtou.cn/article-64437.html','页面编码gb2312|utf-8默认gb2312'));)
Ubuntu 14.04下Caffe和TensorFlow的ARM NN SDK的aarch64编译环境搭建及MNIST程序测试
ARM官方测试环境
• SCons. Arm has tested SCons 2.4.1, other versions might work.• CMake. Arm has tested CMake 3.5.1, other versions might work.
• Boost. Arm have tested version 1.64.
• Protobuf. Arm has tested version 3.5.0.
• ARM NN SDK
• Compute Library
• Caffe及相关
1. SCons安装
无论安装是否安装过SCons,都可以在root用户下执行以下命令 > 1.rm /usr/local/bin/scons*
>2.rm -r /usr/local/lib/scons*
下载官方推荐版本,将安装包放入/home/armnn,解压进入/home/armnn/scons-2.4.1# 执行
>sudo python setup.py install
应该会顺利的安装结束
2.安装CMake
卸载原有系统上安装的cmake(如果不卸载系统自带的,直接安装,可能会出现错误)。 > apt-get autoremove cmake
下载CMake-3.5.1-linux-x86_64.tar.gz,或者官网下载,然后直接sh cmake-3.11.1-Linux-x86_64.sh即可;如果是下载了*tar.gz的放到/home/armnn/下解压然后执行
ln -s /home/armnn/cmake-3.5.1-Linux-x86_64/bin/* /usr/bin/
3.下载安装boost
官网下载1.64.0版本,放入/home/armnn/解压之后的文件夹为boost_1_64_0,进入该文件夹运行sh bootstrap.sh,运行结果如下所示:
Building Boost.Build engine with toolset gcc… tools/build/src/engine/bin.linuxx86_64/b2修改修改project-config.jam文件
Detecting Python version… 2.7
Detecting Python root… /opt/fsl-imx-wayland/4.9.51-mx8-ga/sysroots/x86_64-pokysdk-linux/usr
Unicode/ICU support for Boost.Regex?.. not found.
Generating Boost.Build configuration in project-config.jam…
Bootstrapping is done. To build, run:
./b2
To adjust configuration, edit ‘project-config.jam’.
Further information:
-Command line help:
./b2 --help
- Getting started guide:
http://www.boost.org/more/getting_started/unix-variants.html
- Boost.Build documentation:
http://www.boost.org/build/doc/html/index.html
if ! gcc in [ feature.values ]保存后执行
{
using gcc : arm : aarch64-poky-linux-gcc --sysroot=$SDKTARGETSYSROOT
}//注意冒号后面的空格若为32位平台则如下
if ! gcc in [ feature.values ]
{
using gcc : arm : arm-linux-gnueabihf-gcc ;
}//注意编译的时候要是能你的编译器的环境变量
./b2 link=static cxxflags=-fPIC --with-filesystem --with-test --with-log --with-program_options如图所示64位arm平台:


4.使用 SCons编译Compute Library using
对于ARMv7-A架构的设备在/home/armnn/Compute Library/运行下面的指令进行编译:scons extra_cxx_flags="-fPIC" benchmark_tests=1 validation_tests=1 neon=1aarch-ARMV8的架构执行
scons arch=arm64-v8a extra_cxx_flags="-fPIC" benchmark_tests=0 validation_tests=0 opencl=1 embed_kernels=1 neon=1如果提示以下错误:
ERROR: Compiler ’ aarch64-linux-gnu-aarch64-poky-linux-g++ --sysroot=/opt/fsl-imx-wayland/4.9.51-mx8-ga/sysroots/aarch64-poky-linux’ not found修改SContruct文件下ARMV8的prefix为“”空,
前提要先使能编译器环境在这里使用的nxp的编译器aarch64-poky-linux-g
elif env[‘arch’] == ‘arm64-v8a’:大概一个小时可以编译完吧,期间可以安装后面的环境
env.Append(CXXFLAGS = [’-march=armv8-a’])
env.Append(CPPDEFINES = [‘ARM_COMPUTE_AARCH64_V8A’,‘NO_DOT_IN_TOOLCHAIN’])
if env[‘os’] == ‘linux’:
prefix = “aarch64-linux-gnu-”//改为 prefix = “”
5.编译protobuf
下载git clone https://github.com/protocolbuffers/protobuf.git首先为了能够使用x86的protoc编译Caffe,这里先不对protobuf进行任何配置直接执行
cd protobuf
git submodule update --init --recursive
./autogen.sh一般会提示
configure.ac:104: error: possibly undefined macro: AC_PROG_LIBTOOL此时需要执行
错误
apt-get install libtool执行autogen.sh之后,再执行./configure
依次执行make、make check 、make install 时间在半小时至一小时不等,可以先做其他事
 之后我们去编译Caffe和配置TensorFlow,等编译完成后,我们执行make clean后重新配置configure按照以下两种平台执行
ARMv7-A架构:
./configure --host=arm-linux
CC=arm-linux-gnueabihf-gcc
CXX=arm-linux-gnueabihf-g++
–with-protoc=/home/armnn/protobuf/bin/protoc
ARMv8-A架构使用自己你的目标板编译器:
./configure --host=aarch64-linux CC=aarch64-linux-gnu-gcc CXX=aarch64-linux-gnu-g++ --with-protoc=/home/armnn/protobuf/bin/protoc
6编译Caffe
git下载地址 git clone https://github.com/BVLC/caffe.git安装环境可以参考官方安装
以下笔者根据官方的挑出14.04需要的
BLAS: apt-get install libatlas-base-dev or install OpenBLAS by sudo apt-get install libopenblas-dev or MKL for better CPU performance.安装完成之后进入caffe目录
Python (optional): if you use the default Python you will need to sudo apt-get install the python-dev package to have the Python headers for building the pycaffe interface.
apt-get install libprotobuf-dev libleveldb-dev libsnappy-dev libopencv-dev libhdf5-serial-dev protobuf-compiler
apt-get install --no-install-recommends libboost-all-dev
apt-get install libgflags-dev libgoogle-glog-dev liblmdb-dev
mkdir buildmake all时汇报很多错误,在错误的开头会提示
cmake …
make all
make install
make runtest
error This file requires compiler and library support for the ISO C++ 2011 standard. This support is currently experimental, and must be enabled with the -std=c++11此时需要在CMakeList.txt 的第57行添加
or -std=gnu++11 compiler options.
set(CMAKE_CXX_FLAGS “-fPIC -std=c++11”)
7下载TensorFlow
下载到/home/armnn目录下git clone https://github.com/tensorflow/tensorflow.git进入到tensorflow执行
/home/armnn/armnn/scripts/generate_tensorflow_protobuf.sh /home/armnn/protobuf/src/正常情况什么都不提示,如果提示
/home/armnn/protobuf/bin/protoc: 1: /home/armnn/protobuf/bin/protoc: Syntax error: Unterminated quoted string是因为protobuf编译没使用默认的x86编译,重新编译protobuf,之后make install
8 编译ARMNN-SDK
下载:git clone https://github.com/ARM-software/armnn.git进入armnn,修改CMakeLists.txt,在首行添加
set(CMAKE_CXX_FLAGS “${CMAKE_CXX_FLAGS} -std=c++11 -Wall -Werror -Wold-style-cast -Wno-missing-braces -Wconversion -Wsign-conversion -pthread”)创建build,进入build
SET(BOOST_ROOT /home/garylau/boost_1_64_0)
cmake … -DARMCOMPUTE_ROOT=/home/armnn/ComputeLibrary -DARMCOMPUTE_BUILD_DIR=/home/armnn/ComputeLibrary/build -DBOOST_ROOT=/home/armnn/boost_1_64_0 -DTF_GENERATED_SOURCES=/home/armnn/protobuf/src -DCAFFE_GENERATED_SOURCES=/home/armnn/caffe/build/include -DBUILD_CAFFE_PARSER=1 -DARMCOMPUTENEON=1 -DBUILD_TF_PARSER=1 -DPROTOBUF_LIBRARY_RELEASE=/home/armnn/protobuf/src/.libs/libprotobuf.so -DPROTOBUF_LIBRARY_DEBUG=/home/armnn/protobuf/src/.libs/libprotobuf.so -DPROTOBUF_INCLUDE_DIRS=/usr/local
make完成后如图,第一次编译完成后忘记保存图片
 build下会出现armnn的caffe和tensorflow库和单元测试程序UnitTests

下面我们将环境移植到开发板,笔者使用的是NXP的i.mx8mqevk的开发板,通过scp的命令将build下的程序考入目标板
scp -r libarmnn* UnitTests root@192.168.0.101:/home/root/
scp -r /home/armnn/protobuf/src/.libs/libprotobuf.so.17 root@192.168.0.101:/home/root/
 将libarmnn前缀的4个库都mv到根目录/lib/
9 MNIST(手写体图片识别测试程序)的测试
首先现在官方提供的例程:git clone https://github.com/ARM-software/ML-examples.git进入ML-examples/armnn-mnist,编辑Makefile如下
ARMNN_LIB = /home/armnn/armnn/build
ARMNN_INC = /home/armnn/armnn/include
BOOST_ROOT = /home/armnn/boost_1_64_0
PROTOBUF = /home/armnn/protobuf/src/.libs

all: mnist_caffe mnist_tf

mnist_caffe: mnist_caffe.cpp mnist_loader.hpp
	$(CXX) -O3 -std=c++14 -I$(ARMNN_INC) -I$(BOOST_ROOT) mnist_caffe.cpp -o mnist_caffe -L$(PROTOBUF) -L$(ARMNN_LIB) -lprotobuf  -larmnn -larmnnCaffeParser -lpthread

mnist_tf: mnist_tf.cpp mnist_loader.hpp
	$(CXX) -O3 -std=c++14 -I$(ARMNN_INC) -I$(BOOST_ROOT) mnist_tf.cpp -o mnist_tf  -L$(PROTOBUF) -L$(ARMNN_LIB) -lprotobuf -larmnn -larmnnTfParser -lpthread

clean:
	-rm -f mnist_tf mnist_caffe

test: mnist_caffe mnist_tf
	LD_LIBRARY_PATH=${LD_LIBRARY_PATH}:$(ARMNN_LIB) ./mnist_caffe
	LD_LIBRARY_PATH=${LD_LIBRARY_PATH}:$(ARMNN_LIB) ./mnist_tf
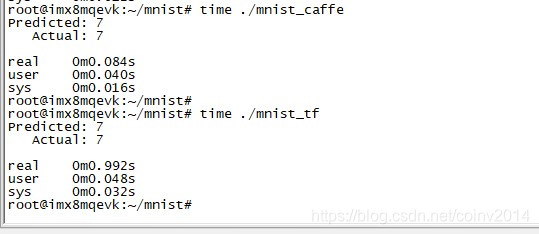
编译的时候要注意你使用的交叉编译器,你的protobuf库,v7架构没有在caffe的编译出增加 -lpthread,但V8不增加的话会提示错误之后进行make,编译完成后把文件夹下面的data和modle和生成的mnist_caffemnist_tf都scp到目标板,分别执行mnist-caffe和mnist_tf如下
 到此,环境搭建并测试完成,有问题欢迎大家留言讨论